DLL Proxying
This post will be the first part in a series on DLL Security covering topics such as DLL Proxying, DLL Injection, and IAT Hooking. Stay tuned :)
In this post we’ll focus on the theory of a technique known as DLL Proxying, also known as DLL Redirection or DLL Reflection. In a next post we’ll focus on implementing the technique!
Tools and Prerequisites
The following software is used to examine the PE Header of an executable: CFF Explorer
This post is rather technical, and as such, assumes knowledge of C++ and Windows Programming using Visual Studios. A basic understanding of DLL’s and how to implement one in C/C++ is a bonus.
Introduction
When studying the PE Executable Format, I ran into an explanation of how the computer worm Stuxnet used a technique known as DLL Proxying, which is made possible by a PE feature called Forward Exports. DLL Proxying was used in Stuxnet’s attack phase to control and monitor communication to Programmable Logic Controllers (PLCs), specifically targeting the centrifuge rotors at a too-low or too-high frequency. The study of Stuxnet is fascinating on its own, I deeply encourage readers to read more at: The Stuxnet Worm.
Absolutely fascinated by how Stuxnet used DLL Proxying in its attack phase, I wanted to consider how exactly this technique is done, and in turn, implement such a technique (in a non-malicious way of course).
This post will focus on how exactly DLL Proxying works. We’ll first begin with an overview of this technique and then explore how it is made possible with features of the PE executable format.
Please note this post is related to a project I created which automates much of this technique. The project with its details can be found here: DLL Wrapper
DLL Proxying Overview
DLL Proxying is a technique in which an attacker replaces a DLL with a Trojan version, renaming the original rather than deleting it. This Trojan DLL implements exclusively the functions which the attacker wishes to intercept/modify, while forwarding all other functions to the original DLL, thus the name “Proxy”. The attacker can then Man in the Middle the functions they’re interested in, and forward the rest to the original DLL, minimizing the amount of work needed while ensuring functionality is not reduced or broken.
The entire attack is conducted in a six-step process:
- Analyze the original DLL, from here referred to as “target DLL”
- Identify functions to intercept/modify
- Implement intercepted functions in Trojan DLL
- Forward all other functions to the target DLL (the original DLL)
- Rename the target DLL
- Place Trojan DLL with original name of target DLL
While the entire attack is a six-step process, this process can be grouped into two phases:
- Creation of the Trojan DLL
- Implementation of the Trojan DLL
In the first phase, the Trojan DLL must be coded, with intercepted functions implemented and exported. All remaining functions must make use of the PE formats Forward Exports to export to the original DLL.
In the second phase, write permissions will be required at the target DLLs location to rename the original DLL, and write the Trojan in its place.
This technique has several advantages:
- It’s simple to implement
- We have full control over intercepted functions, including the ability to monitor calls to the original
- We do not directly modify the target application or DLL
This technique relies on the ability to forward non-implemented functions to the original DLL (which has been renamed). The next section will give an overview of what an exported function is, followed by an overview of the PE executable format, specifying how it can be leveraged to implement such a technique.
DLL Exported Functions
Let’s begin by reviewing what is an exported function. A function that is exported by an executable can be called and used by other applications. Retrieving an exported function is done through two functions in Windows:
- LoadLibrary – Returns a handle for an executable
- GetProcAddress – Returns a function pointer to the exported function
An exported function can be retrieved by name, or by ordinal. The name would be the function name given by the developer, and the ordinal is a unique numerical value given to each exported function. It’s important to note that giving a name to an exported function is optional, an ordinal value on the other hand is not. If an ordinal value is not explicitly given, the linker will assign one of its choice.
Despite the name being optional, most developers export functions with a name, and retrieve it with a name as the ordinal value can be changed from one update to the next. Also, frankly, names are much easier to remember and identify.
Finally, the last detail to know about exported functions; the function does not have to be implemented in the DLL that is exporting it!
Wait, what?
This is known as a Forward Export, and, although not commonly used, is used by Windows NTDLL.dll, Kernel32.dll, etc.
A Forward Export allows a developer to export a function from one module to be handled by another. This is very useful for backwards compatibility (for example), and of course, was very useful for Stuxent when implementing it’s attack phase.
We’ll detail what a Forward Exported Function looks like in the next section.
PE Executable Format
The PE Executable Format is used for all windows executables, including DLLs, System Files (kernel drivers), Control Panel files (.cpl), and even Screensavers (.scr). It is used by the Windows Loader to manage the executable code, detailing where execution should start, the size of the image in memory, code/data sections, Thread Local Storage information, Imports, Exports, etc.
The PE Executable format is far too large of a topic to cover thoroughly in this post, rather, we will see how we can use CFF Explorer to parse the PE format for us, and of course, how to find the exported functions.
Let’s begin by defining two terms:
- RVA – Relative virtual address. This is the file offset in bytes (usually represented in hexadecimal), and the offset relative to where the file is mapped in memory.
- VirtualAddress – The address of an item after it is loaded into memory. Equal to the offset + base address of image.
Let’s now take a look at a DLL, Attacker_Example.dll, using CFF Explorer. This is a DLL I specifically made for this purpose, it contains Exported Functions as well as a Forward Exported Function.
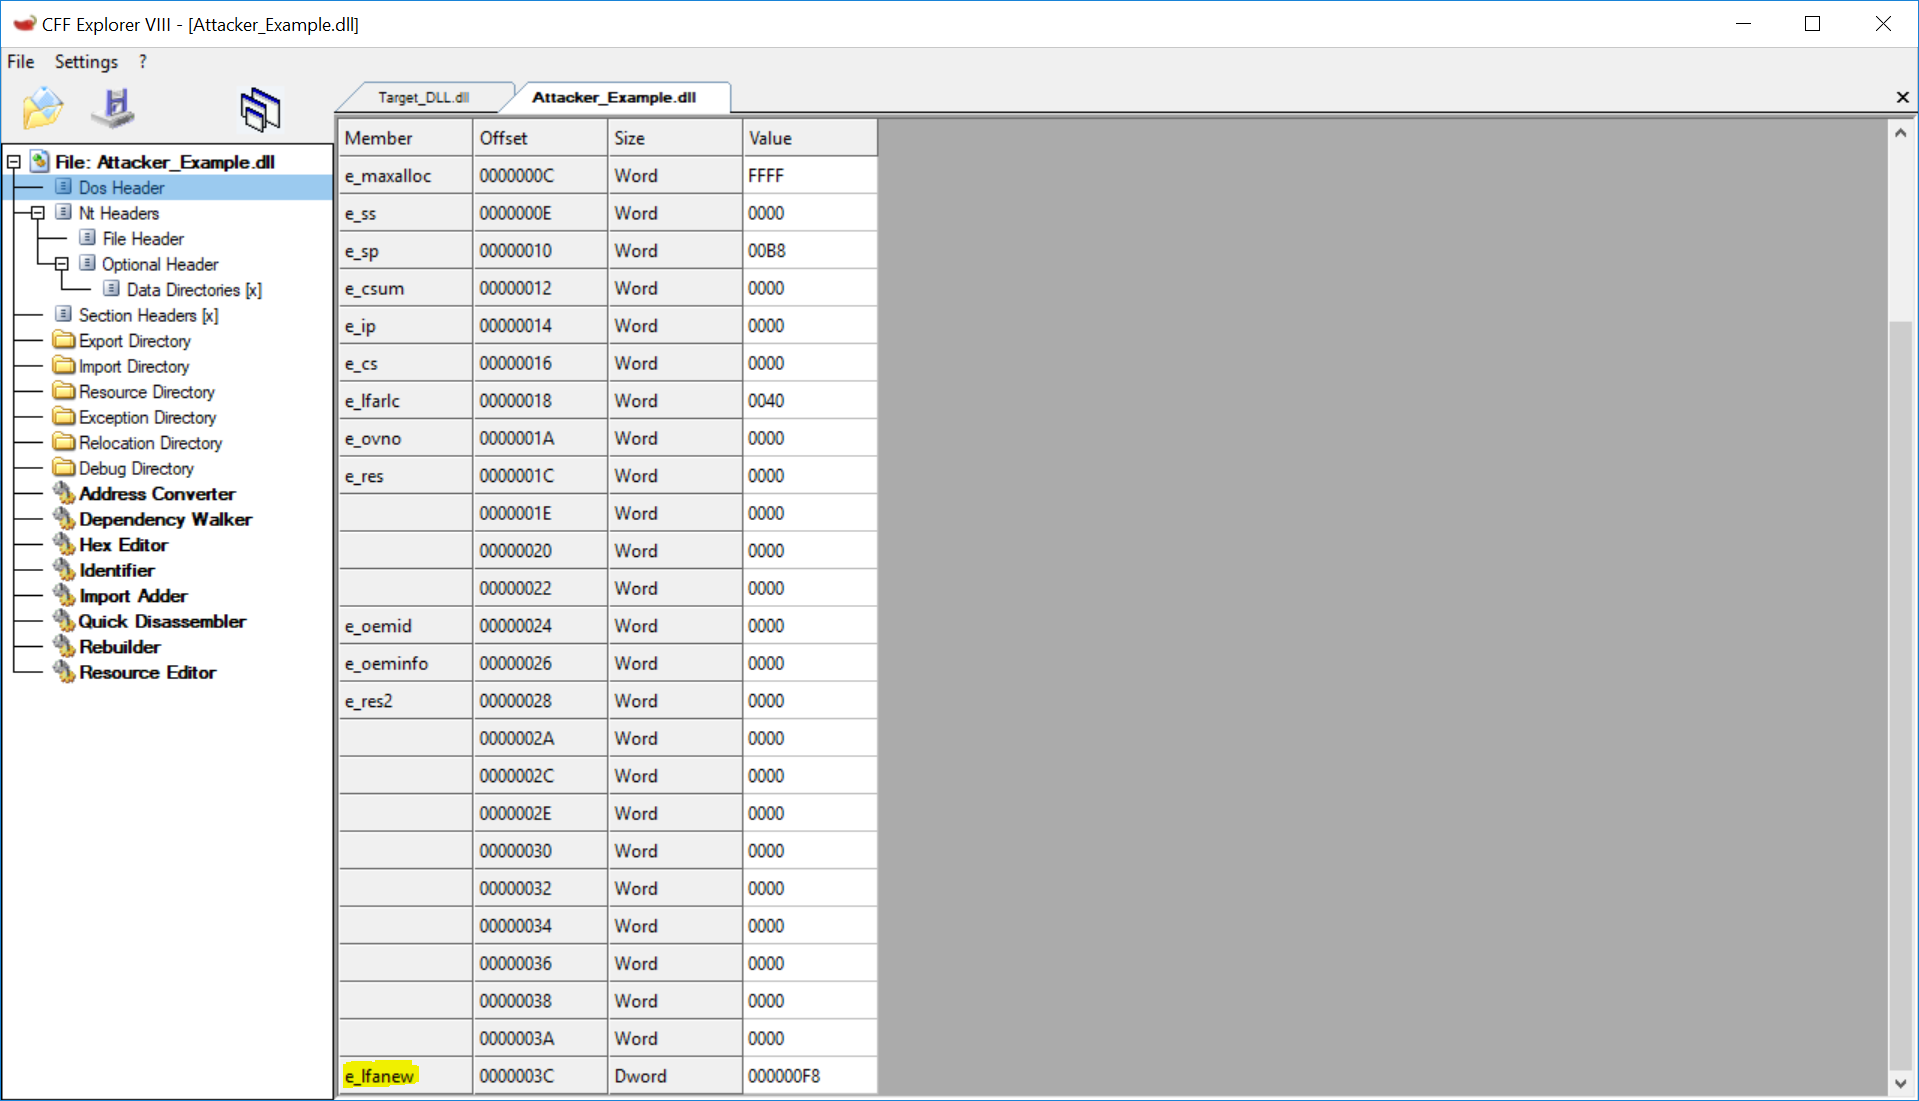
CFF Explorer DOS-Header:
The PE Header, for legacy reasons, always starts with a DOS Header. The value we
care about in this header is e_lfanew. This specifies the file offset
where the PE Header can be found.
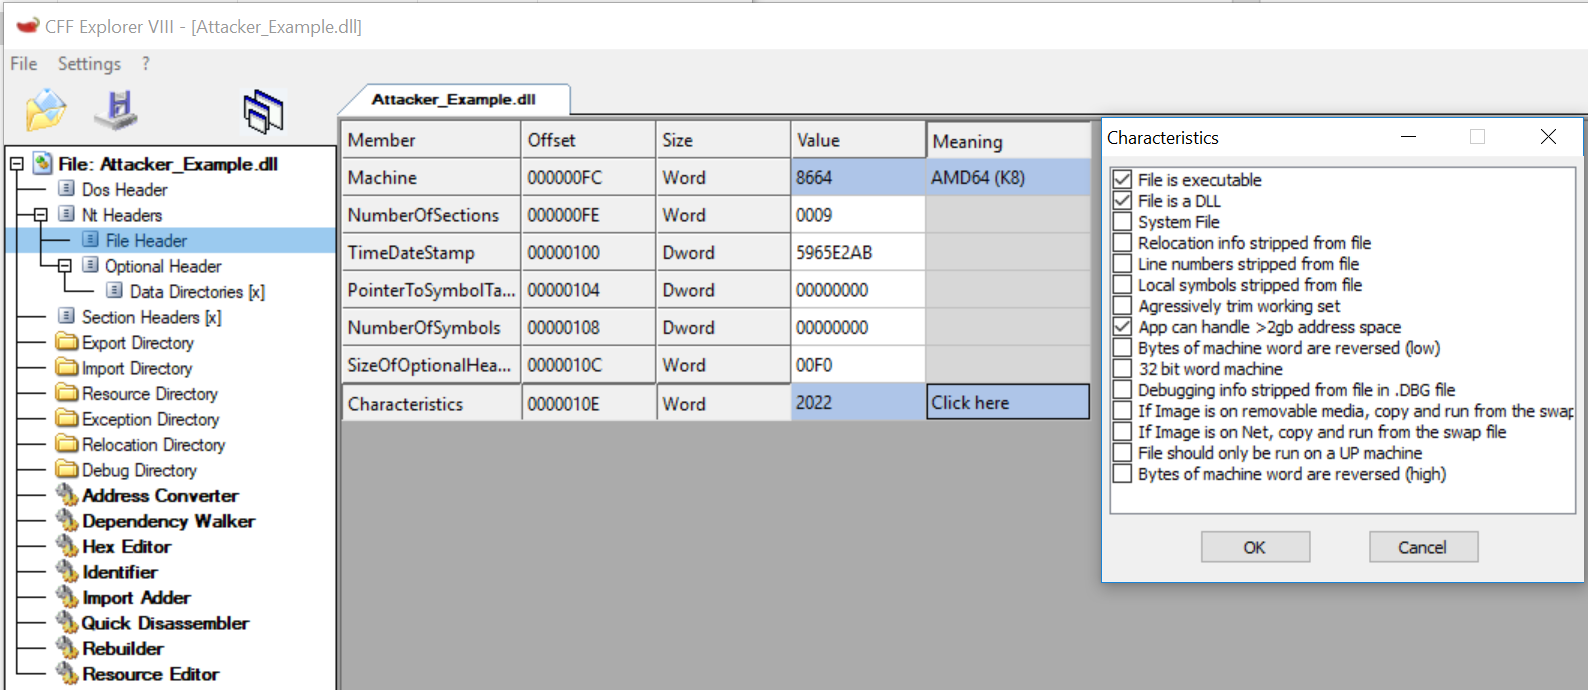
CFF Explorer NT Header
Inside the PE Header (also called the NT Header) we have a few key elements:
- Machine: Architecture of the executable. This file is a x64 DLL, thus it’s AMD64.
- Characteristics: We can see this is a DLL.
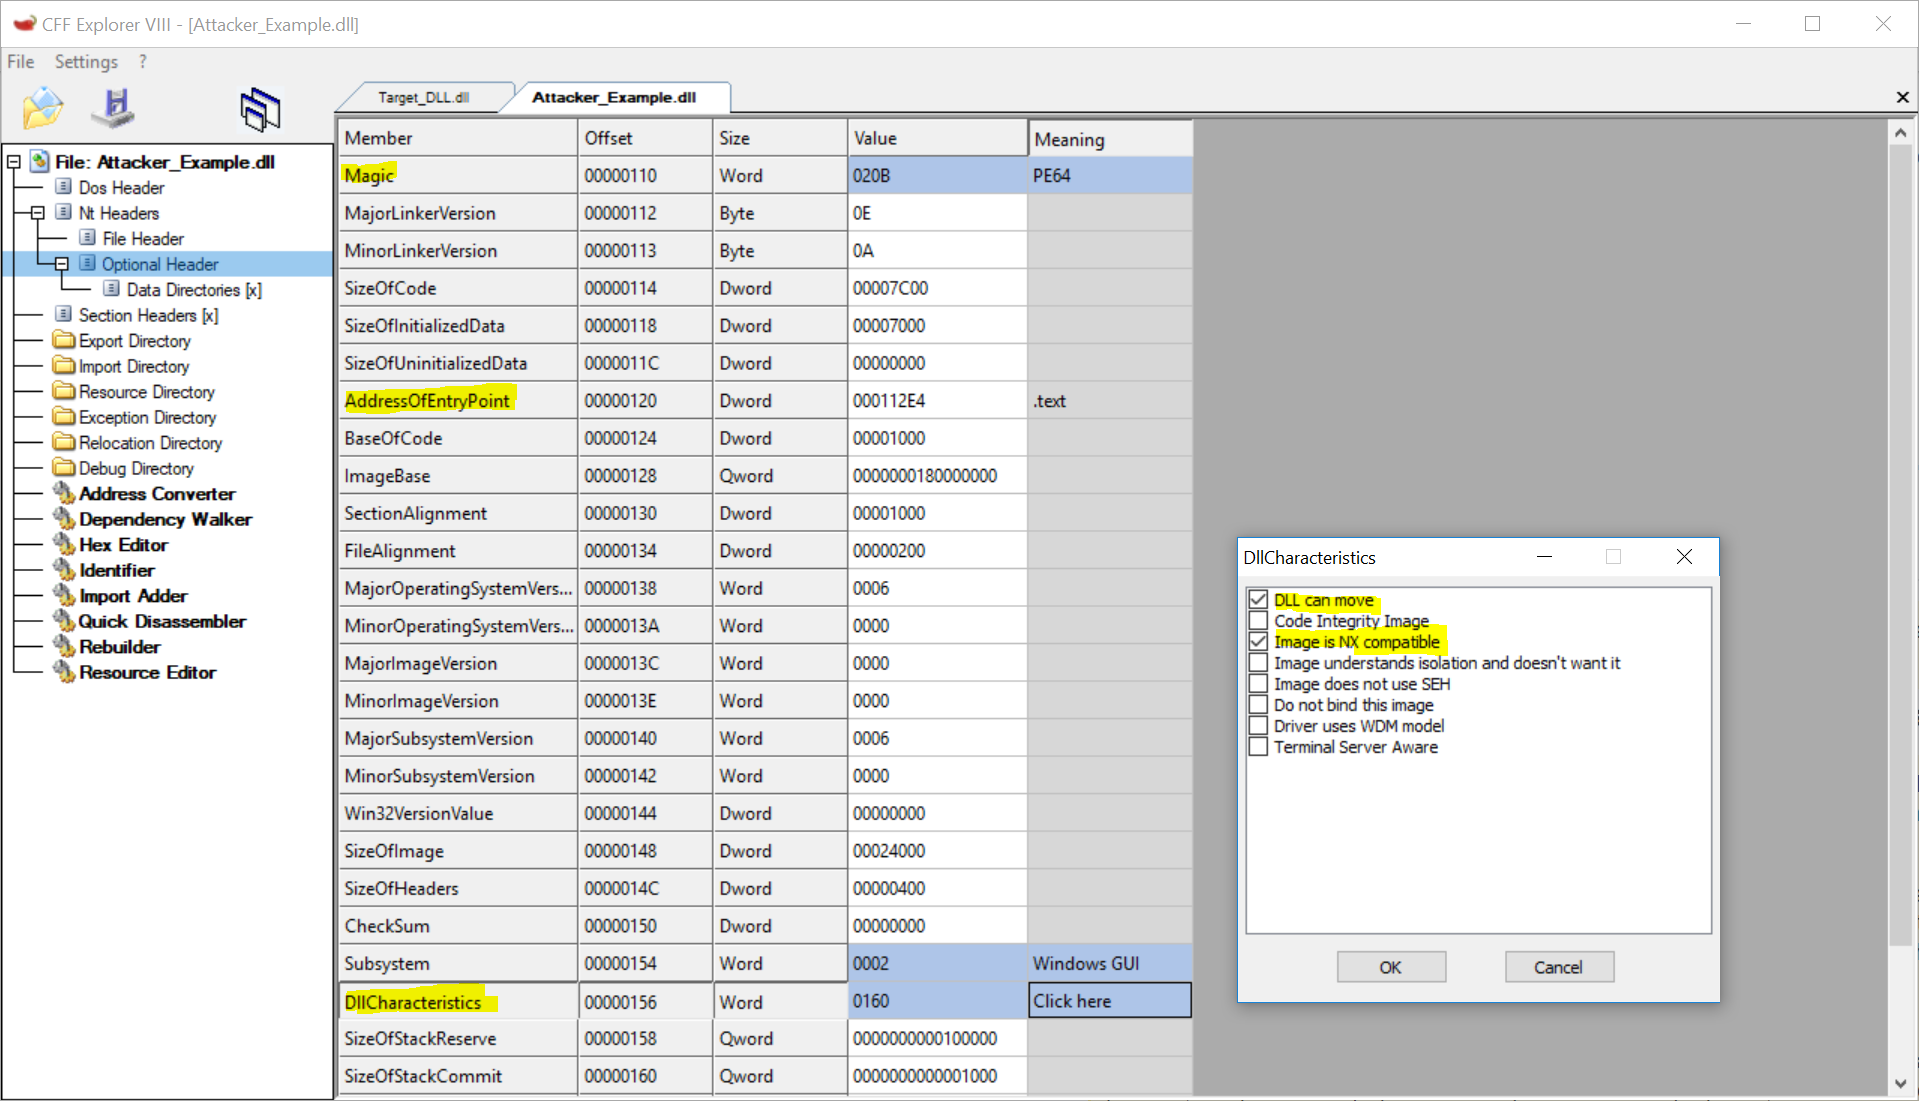
CFF Explorer NT Optional Header
The NT Header contains an Optional Header (which ironically is not optional). The key elements are:
- Magic: Confirms whether x32 or x64 executable. Here it’s PE64, confirming we have an x64 file.
- AddressOfEntryPoint: RVA of where code will start executing once loaded by the Windows Loader. If debugging an unknown file, this is a good place to set a breakpoint.
- DllCharacteristics: A few interesting values to note:
- DLL can move: Supports ASLR
- Image is NX Compatible: Supports DEP
- DataDirectories: An array containing a VirtualAddress and Size for
each directory. Directories include: Export, Import, Resource, Debug, etc.
- Note: The section it is located in must be manually computed. CFF Explorer did it for us.
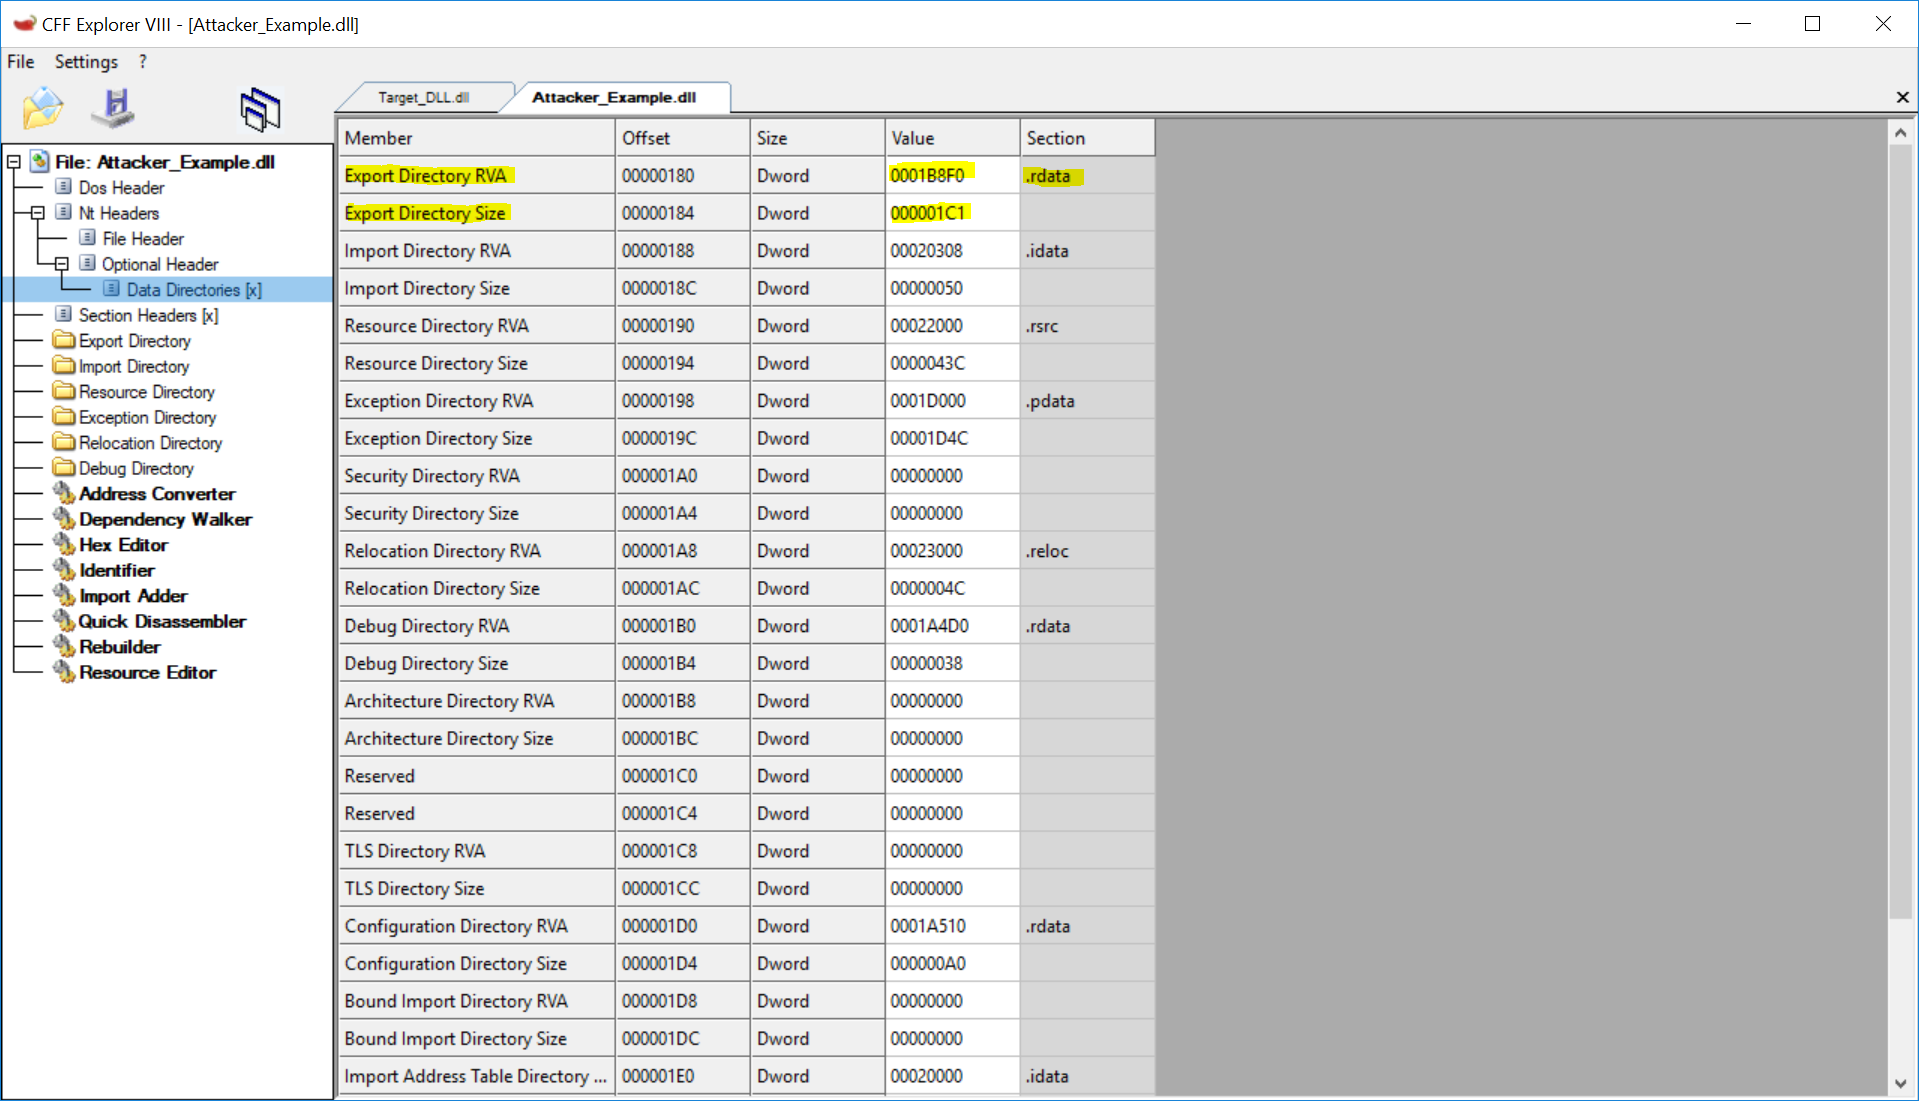
CFF Explorer DataDirectories
Now, to find the Export Directories location in the file, we need to use the following formula:
File Offset = Section.RawAddress + (DataDirectory.VirtualAddress - Section.VirtualAddress)
In this case:
- Section = rdata
- Section.RawAddress = 8000
- Section.VirtualAddress = 19000
- DataDirectory.VirtualAddress = 1B8F0
Our file offset is A8F0.
This step is necessary because CFF Explorer will not show us if an exported function is a Forward Export or not.
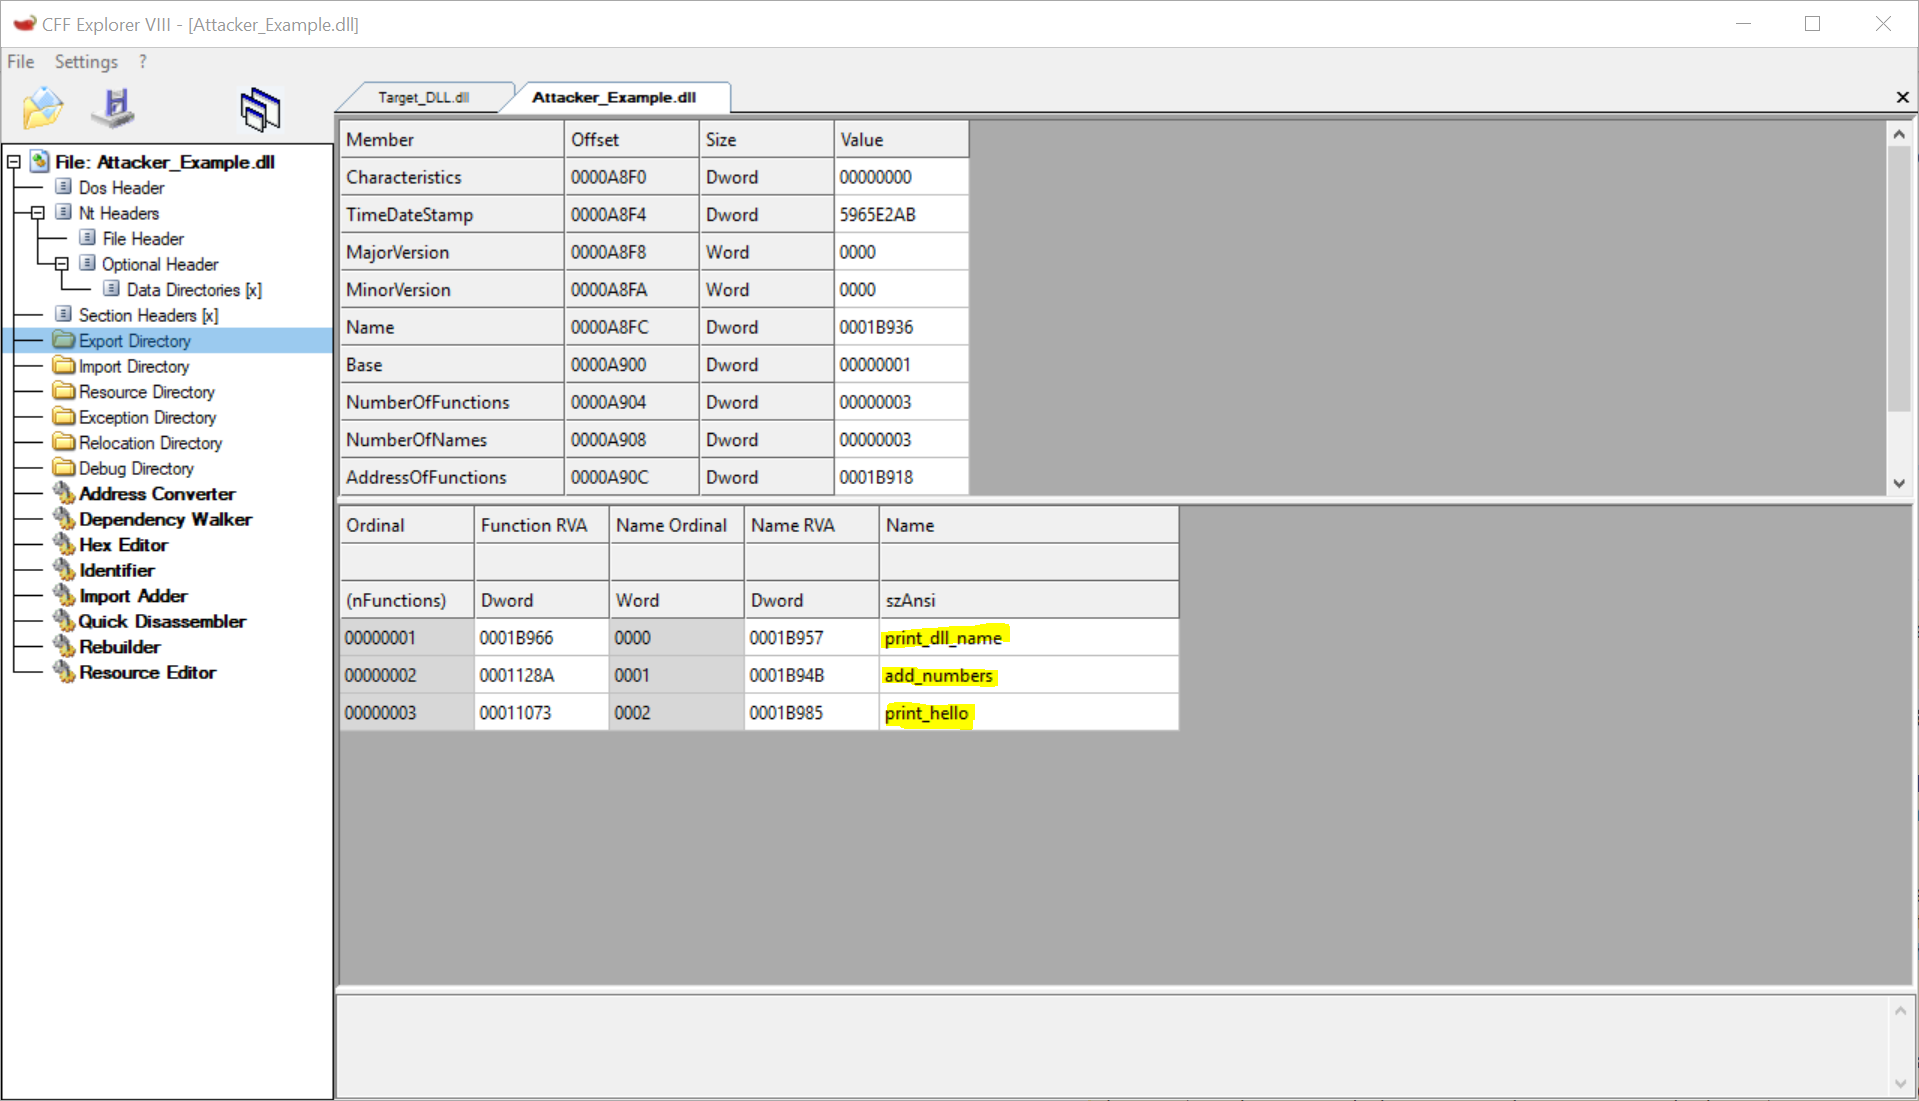
CFF Explorer Export Directory
As we can see, we have three functions, exported by name. These are the names
used when calling GetProcAddress to get a function pointer. Again, we
cannot tell just by this screen that print_dll_name is a Forward Export.
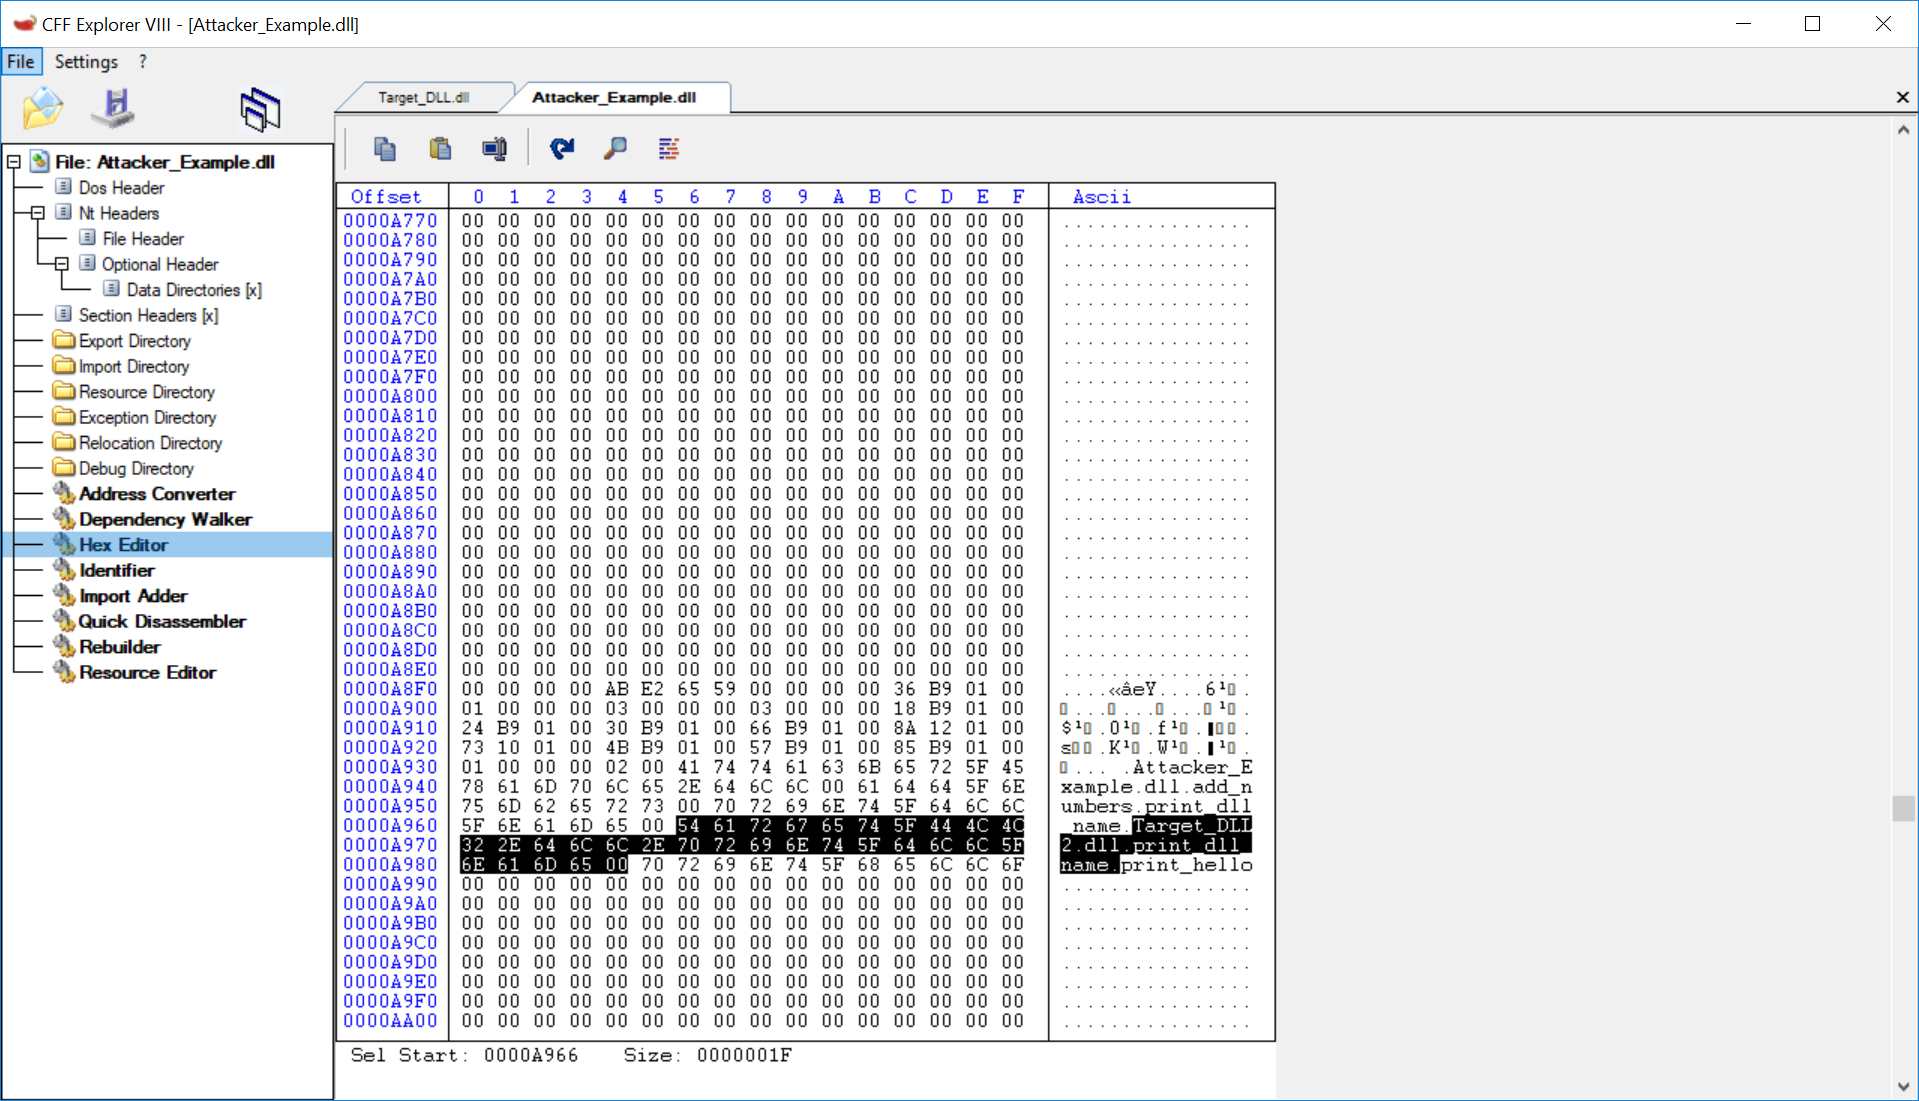
To do so, we must open the Hex Editor and go to offset A8F0.
CFF Explorer Hex Editor
We can see the name of print_dll_name follows a different format than the
others; it begins with a DLL name.
Target_DLL2.dll.print_dll_name
This is telling us that although this DLL is exporting a function named
print_dll_name, the function is actually located in Target_DLL2.dll.
When calling Forward Exported functions, the Windows Loader will check if the
DLL referred to (here Target_DLL2.dll) is loaded. If the referred DLL is
not already loaded into memory, the Windows Loader will load it, and finally,
will retrieve the address of the function (here print_dll_name) so that we
may call it.
Conclusion
As we saw, DLL Proxying is made possible by a feature of the PE executable format known as Forward Exports. The Trojan DLL simply replaces the original, renaming the original DLL rather than deleting it, and forwarding to it all non-implemented functions.
Detection of such a technique is simple. The signature of the Trojan DLL will be radically different to the original, and upon manual static analysis, will contain a lot of forward exported functions.
Thanks for reading!
References
This post was made possible thanks to intercept_apis_dll_redirection which I used as a reference when implementing this technique. I highly encourage readers to take a look, it’s amazing.

Leave a Comment